EasyThreeD X1 Heated Bed Mod
(If you don't want to read this whole thing, skip to the end of the post for a tl;dr version)
I was lucky enough to get a Labists X1 3D printer for Christmas a few weeks ago, and it's the first 3D printer I've had or really even interacted with.
It's been a fascinating journey so far, learning about how to calibrate a printer, how to use slicers, and how to start making my own models.
Something that became obvious fairly quickly though, was that the printer would be more reliable with a heated bed. I've been able to get reliable prints via the use of rafts, but that adds time to prints and wastes filament, so I decided to see if I could mod the printer to have a heated bed.
I started Googling and quickly discovered that my printer is actually a rebadged EasyThreed X1 and that EasyThreed sell a hotbed accessory for the X1, but it's an externally powered/controlled device. That's fine in theory, but I have quickly gotten very attached to being able to completely remotely control the printer via Octoprint. So, the obvious next step was to try and mod the printer to be able to drive the heater directly.
Looking inside the controller box showed a pretty capable circuit board:
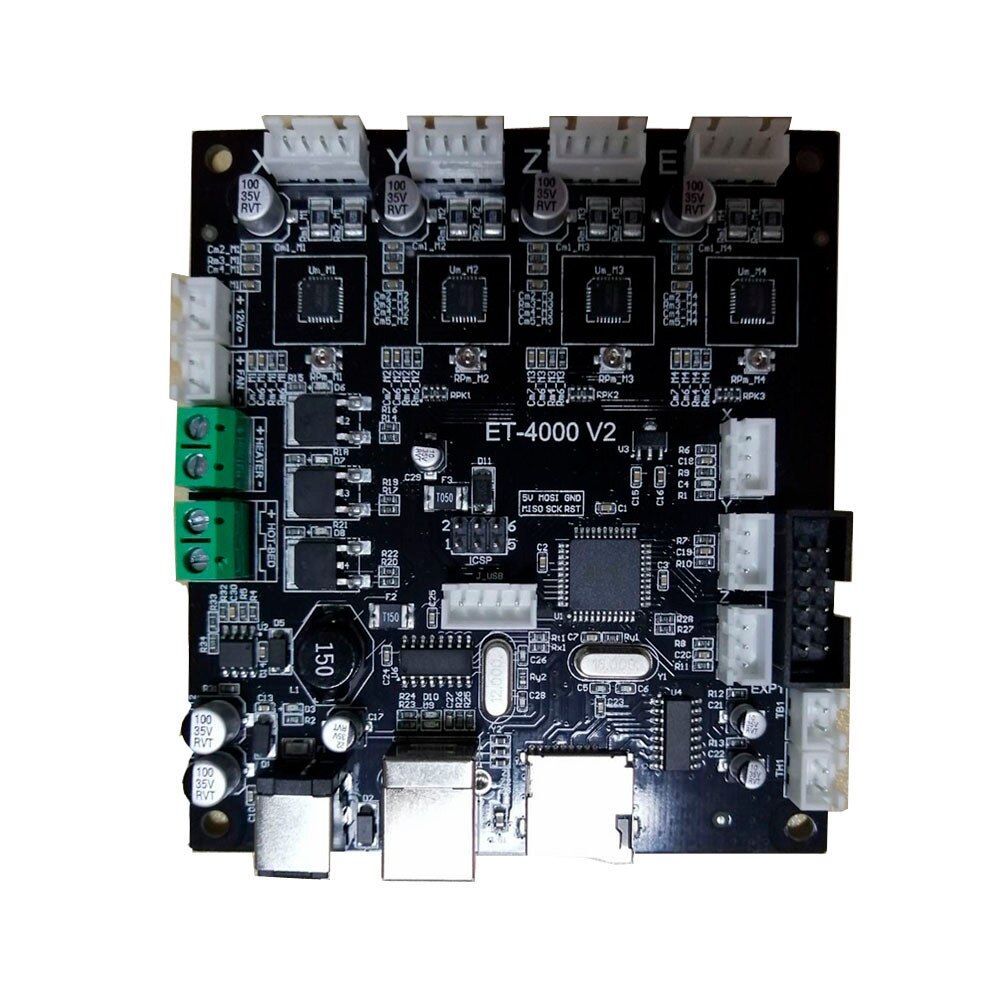
but it was instantly obvious that next to the power terminal for the extruder heater, was a terminal labelled HOT-BED:

Next on my journey of discovery was the communication info that Octoprint was sending/receiving, among which I saw:
Recv: echo:Marlin 1.1.0-RC3
which quickly led me to the Marlin open source project which, crucially, is licensed as GPL. For those who don't know, GPL means that since Labists have given me a binary of Marlin in the printer, they have to give me the source code if I ask for it.
I reached out to Labists and they were happy to supply the source, then I also emailed EasyThreed to ask if I could have their source for the X1 as well (and while I was at it, their X3 printer, which looks a lot like the X1, but ships with a heated bed already as part of the product). They sent me the source with no real issues, so I grabbed the main Marlin repo, checked out the tag for 1.1.0-RC3 and started making branches for the various Labists/EasyThreed source trees I'd acquired. Since their changes were a bit gratuitous in places (random whitespace changes, DOS line endings, tabs, etc) I cleaned them up quite a bit to try and isolate the diffs to code/comment changes.
Since it's all GPL, I've republished their code with my cleanups:
The specific diffs aren't particularly important (although the Labists firmware does have some curious changes, like disabling thermal runaway protection), but by reading up a bit on configuring Marlin, and comparing the differences between the X3 and the X1, it seemed like very little would need to change to enable the bed heater and its temperature sensor (a header for which is also conveniently present on the controller board).
At this point in the investigation I had:
- A controller board with:
- A power terminal for a bed heater
- A header for a bed temperature sensor
- Source for the controller firmware
- Source for an extremely similar printer that has a bed heater
- An external bed heater with power and sensor cables
Not a bad situation to be in!
Diving into the firmware, I found that Marlin keeps most board-specific settings in Configuration.h and specifically, it contains #define TEMP_SENSOR_BED 0. The number that TEMP_SENSOR_BED is defined as, indicates to Marlin what type of temp sensor is attached (with 0 obviously meaning nothing is attached). The X3 has a value of 1 (a 100k thermistor), but I found that I could only get reliable readings with it set to 4 (a 10k thermistor).
Believe it or not, that's actually the only thing that has to change, but I did also change #define BED_MAXTEMP 150 because 150C seems kind of high. This define sets a temperature at which Marlin will shut itself down as a safety measure. As far as I can tell, 50C-70C is a more realistic range for PLA, and even with ABS it seems as though 110C is recommended. I haven't printed ABS yet and don't have any real plans to, so I reduced the safety limit to 100C.
I also modified the build version strings in Default_Version.h so I'd be able to quickly tell in Octoprint if I had successfully uploaded a new firmware.
Next came the challenge of building the firmware. I grabbed the latest Arduino IDE, but it failed to compile Marlin correctly (perhaps because I was using the macOS version of Ardino IDE). Labists helpfully included a Windows build of Arduino IDE 1.0.5 with their firmware source, which was able to build it. Arduino IDE is also GPL, but I haven't republished that yet because I haven't audited the archive for other things that I don't have rights to distribute.
To get the firmware to upload correctly to the X1, I had to set the board type in Arduino IDE to Melzi and select the COM port for its USB interface, except its USB interface wasn't showing up and Windows' Device Manager couldn't find a driver for it. Some Googling for the USB VID/PID of that device led me to the manufacturer of the CH340 chipset and their drivers.
Finally the moment of truth - was I about to destroy a controller board with a bad firmware/driver? I clicked the Upload button, waited for it to complete, attached the controller to my Octoprint machine again and.......
Recv: echo:Marlin 1.1.0-RC3-cmsj
Success! I then waited for Octoprint to start communicating with the printer and monitoring temperatures...
Recv: ok T:24.2 /0.0 B:23.6 /0.0 T0:24.2 /0.0 @:0 B@:0
For those of you who aren't familiar with Octoprint/GCode, the T:24.2 is the temp sensor in the extruder and the B23.6 is the reading from the bed sensor! Another success!
After replacing the X1's 30W power supply with a 60W variant so it could power the motors and the heater, I asked it to heat up to 50C, and after a little while....
Recv: ok T:28.1 /0.0 B:49.9 /50.0 T0:28.1 /0.0 @:0 B@:127
Perfect!
And here is the first test print I did, to make sure everything else was still working:
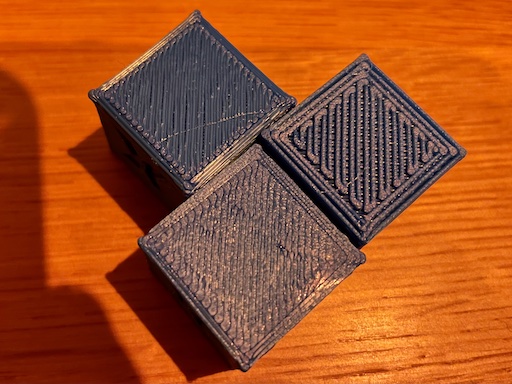
The cubes on the left are from before the heated bed, where I was having to level the bed closer to the nozzle to get enough adhesion and the cube on the right is the first print with the heated bed. I think the results speak for themselves - much better detail retention. It's not visible, but the "elephant's foot" is gone too!
This has been a super rewarding journey, and I'm incredibly grateful to all the people in the 3D printing community upon whose shoulders I am standing. It's a rare and beautiful thing to find a varied community of products, projects and people, all working on the same goals and producing such high quality hardware and software along the way.
And now the tl;dr version
If you want to do this mod to your X1, here are some things you should know, and some things you will need:
- I am not responsible for your printer. This is a physical and firmware mod, please be careful and think about what you're doing.
- Buy the official hotbed accessory, open its control box and unplug the temperature sensor cable. If for some reason you use a different hotbed, it needs to be 12V, draw no more than 30W, and your temp sensor will need to be something that Marlin can understand via the
TEMP_SENSOR_BEDdefine. - Buy a 12V 5A barrel plug power supply (I used this one but there are a million options). Use this from now on to power your X1.
- Grab the modified Marlin source from my GitHub repo:
- Either EasyThreed X1 - see the precise changes from EasyThreed's firmware here
- Or Labists X1 - this has more changes than the EasyThreed version, since I pulled back in some of Labists changes, but left thermal runaway protection enabled.
- Install the CH340 USB Serial drivers. There seem to be lots of places to get these from, I used these
- Install Arduino IDE 1.0.5 - still available from the bottom of this page
- In Arduino IDE, open the
Marlin.inofile from theMarlindirectory and click the ✔ button on the toolbar, this will compile the source so you can check everything is installed correctly. - If you plan to print PLA, you might want to increase the
BED_MAXTEMPdefine to something higher than100. - Remove the bed-levelling screws from your X1, swap the original bed for the heated one.
- Open the controller box of your X1, plug the bed's thermal sensor into the controller board in the
TB1header. - Wire the bed's power into the green
HOT-BEDterminal. For the best results you probably want to unsolder the original power cable from the bed and use something thinner and more flexible (but at the very least you need something longer). - Reassemble the controller box and run all the wires neatly. I recommend you manually move the bed around to make sure neither the power nor temp sensor wires snag on anything.
- Connect the controller box's USB port to your PC, and in Arduino IDE click the ➡ button to compile and upload the firmware. Wait until it says
Upload complete. - In theory, you're done! Check the temperature readings in some software that can talk to the printer (Octoprint, Pronterface, etc.), tell it to turn the bed heater on and make sure the temps rise to the level you asked for. I would definitely encourage you to do this while next to the printer, in case something goes dangerously wrong!